
This is a sponsored post written by me on behalf of The Gorilla Glue Company. All opinions are 100% mine.
Do you ever come up with a project you want to make but really don’t know how you will create it? That was the case with this terrarium globe. I bought embroidery hoops forever ago with the intention of making some type of globe shelf accessory but they have been sitting in my “crafts to do” box for quite awhile (along with so many other craft supplies that I may need to find a “crafts to do” ROOM!)
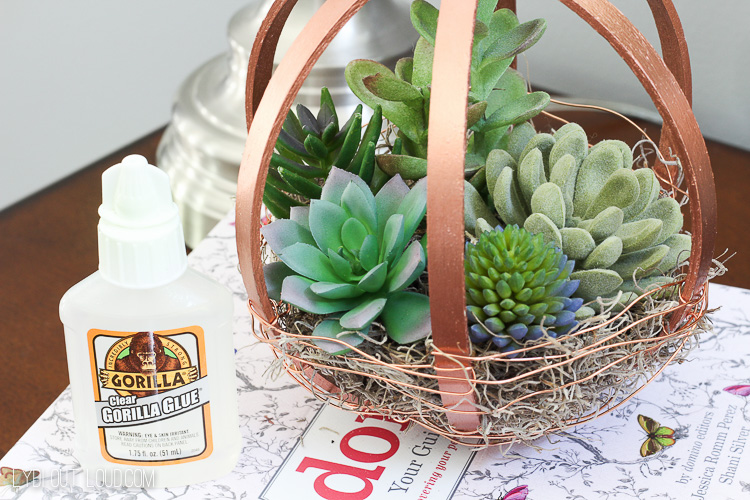
A fun make and take craft we did with Darice at SNAP conference last month filled in the missing link of using wire to create a “bowl” for my terrarium globe… it worked perfectly. Of course I filled it with succulents… I mean are you surprised?! 😉 (If you’d like a reminder of my infatuation with succulents you can start with my succulent monogram here). Anyway, I’m pretty much obsessed… if it was Christmas time my tree would be covered in terrarium globes of all shapes and sizes haha!
Follow along for this easy tutorial to create your own copper terrarium globe.
Embroidery Hoop DIY Terrarium Globe
Supplies
Affiliate links provided
- 2 sets of 5″ or 6″ embroidery hoops
- Clear Gorilla Glue®
- Dazzling Metallics Bright Copper paint
- Foam paint brush
- Wax or parchment paper
- Glue gun
- Gorilla Glue Hot Glue Sticks
- Copper craft wire (about 20 gauge)
- Spanish moss (I get this from the dollar store)
- Faux succulents
Directions
- Remove the inner hoops from the embroidery hoop sets. Set aside 1 of the outer hoops (you will only need 1 outer and 2 inner hoops).

- Apply a small drop of Clear Gorilla Glue to the inside of one of the small hoops and another directly across (if the circle was a clock you’re applying the drops of glue to 12 and 6 o’clock). Clear Gorilla Clue doesn’t foam or expand so it will be completely undetectable in the terrarium globe “joints”.
- Line up the second small hoop perpendicular to the glued one and slide it inside of the glued hoop so that the contact points of the 2 hoops overlap at the glued spots.
- Clamp both glued spots (chip clips worked like a charm!) and allow glue to cure for 2 hours.
- Remove clamps and apply a drop of glue to the outside of the hoops at the points where the hoops meet.
- Slightly unscrew the threaded screw on the outer hoop and place it around the 2 glued hoops at the mid point so that there is equal distance between all 3 hoops.
- Gently tighten the screw once secure over the other 2 hoops and get out your industrial clamps (aka chip clips) and clamp at 2 points of intersection.
- Allow to cure for 2 hours and remove clips.
- Heat Gorilla Glue Hot Glue sticks in a glue gun. Lay down wax or parchment paper on your work surface and apply a good sized “puddle” of hot glue to the paper and immediately press the base of the terrarium globe into the middle of the puddle (this will act as the stand in a minute).
- Continue to hold the terrarium globe in place on top of the hot glue stand and cover the top of the base with more hot glue to strengthen the stand. Hold in place until the hot glue has hardened.
- Paint the terrarium globe with 2 coats of copper paint, allowing to dry fully between each coat.
- Wrap and secure copper wire around the base of the succulent terrarium globe (almost half way up from the bottom) to create a “bowl” for the moss.
- Stuff moss into the base of the terrarium globe and insert succulents. Add Clear Gorilla Glue to the stems of the succulents to keep them secure in the moss, since it dries perfectly clear you won’t be able to see it at all.


You could also hang the succulent terrarium globe if you’d like by attaching a leather band or some twine.

Our terrarium globe has found a perfect home on the entryway table atop a small stack of books.

I know you wanted to make yourself a terrarium globe but I know you also reeeeally want that $250 Visa Gift Card, right? Enter here:
Clear Gorilla Glue $250 Gift Card Giveaway
$250 would buy a LOT of craft supplies! What are some projects that you would make if you win? Good luck friends!
Pin for later!


Kim O says
If i had the patience i would do this. very cool idea. and looks great!
Lydia says
So funny you say that Kim because I’m not the most patient person either and this actually didn’t require much! 🙂 Thanks so much for stopping by and for your comment!
Emily Smith says
Such a cute simple gift that anyone would love!
Lydia says
Thank you so much Emily! 🙂
Lindsay A. says
What a beautiful project and a great source for inspiration! Thanks for sharing!
Lydia says
Thank you so much Lindsay, that’s so sweet of you!
sherri k says
I could never make this I would just make a mess. But it’s ;pretty.
Lydia says
I think you would surprise yourself Sherri, it was so easy to make!
carol clark says
this is an awesome idea i love it but i cant enter the widget wont let me scoll down to enter after i click on them i cant see the buttons
Lydia says
Thanks so much Carol! I’m sorry you’re having trouble, there isn’t anyone available to fix it over the weekend but I will try to get it fixed Monday so I hope you’ll check back! Enjoy the rest of your weekend!
Gina Ferrell says
I love Gorilla Glue and use it all the time for crafting. This is such a unique and pretty idea for a gift. I always say things that were made from the heart are the special gifts.
Lydia says
Hi Gina! It really is the best, isn’t it? Thank you so much for your sweet comment! I always feel that way about handmade gifts too. Have a great weekend and thanks for visiting! 🙂
shannon fowler says
This looks like a great project. Thanks for sharing!
Lydia says
Thanks so much Shannon! Have a great weekend!
Marsha Colina says
So beautiful! I have to try to make this as a Mother’s Day gift for myself!😊
Lydia says
Thanks so much Marsha! That’s a great idea! All moms deserve to treat themselves for Mother’s Day! I’d love to see it when you’re done!
HS says
I like using Gorilla Glue for crafting.
Lydia says
I agree, it’s a must have for crafting! 🙂
Bruce says
Can’t enter your giveaway – window is too small. I’ve tried MSIE, Chrome and Firefox, so I don’t think the problem is on my end. Hope you can get it fixed so people can enter. Thanks.
Great idea, by the way.
Lydia says
Thanks Bruce! I’m sorry you’re having a problem entering. I wonder if the link was down, maybe try again? I see that many have entered this afternoon. If you still aren’t able to let me know and I’ll see if they can troubleshoot your issue. Have a great weekend! 🙂
christian says
Great Guide!
Lydia says
Thank you Christian!
Darla Peduzzi says
This is such a clever and pretty idea! I would love something like this. Thanks for sharing!
Lydia says
Thanks so much Darla. Thanks for stopping by, I’m so glad you enjoyed it! 🙂
Annie Blue says
Great project! Thanks for sharing!
Lydia says
Thank you Annie, my pleasure! 🙂
mami2jcn says
What a fun idea!
Lydia says
Thanks so much!
Michelle Guderian says
Love it….
Lydia says
Thank you so much Michelle! Thanks for stopping by!
Fernie says
Love this Idea and would put real succulents in and keep it on front porch.
Lydia says
That’s a great idea Fernie! I have a spot on my porch with a hook, maybe I’ll make another to do just that too! 🙂
Peter G says
I love things like this. Makes the house interesting and I live in a warm climate so I can make this with all the plants I like and keep it outside all year round.
Lydia says
Thanks Peter! Ah yes I’d love to be able to have plants outdoors all year!
Regina Prange says
Great idea for a summer centerpiece!
Lydia says
Thanks Regina!
Pamela says
That is so cool. I will definitely be making this. Thanks for the tutorial. I would love to buy some paints along with the wire needed for this project along with some jute rope to make a basket.
Lydia says
Thanks so much Pamela! I would love to see it when you’re done if you would want to send it to me or tag me on social media! It would make my day! 🙂
kim s says
My friend loves making succulent arrangements she’s going to love this! It looks really cool!
Lydia says
Thanks so much Kim! It would make a fun crafternoon with friends for sure! 🙂