
My mom and I have been talking about having a fun crafternoon together for months, well we finally made it happen! When we finally coordinated our schedules, we were like “uh, what should we craft?” Mom said “do you want to play around with felted wool”, to which I replied “what is felted wool?” Does anyone else know what that is? She then led me into her felted wool lair (aka guest room) where a menagerie of shrunken wool sweaters were nearly displayed on the bed. Ohhhh ok I get it now! She washed all of the wool sweaters in the washing machine in HOT water, and dried them in the dryer. The result are these shrunken soft and nubby felted wool sweaters.
How this particular crafternoon came to be is by virtue of the creative scavenger who is my mom! After seeing a variety of projects made with felted wool, she hit the thrift store/garage sales in search of $1 or less wool sweaters. My mom being a bit of a self-described fabric hoarder, she also had some old wool sweaters of mine from high school and college that she loved the pattern on and held on to in case she ever found anything that she could use them for. And that day finally arrived! It was quite a flashback to walk in that room and see sweaters from so long ago, I could remember exact places and pictures with those sweaters on! Anyway enough with the trip down memory lane.
I was fascinated with this felted wool concept but was stumped with what to do with it.
I remembered seeing these cute crocheted mug cozies on Pinterest, but they were not on my craft list because I have no idea how to crochet. Looking at the sleeves of these sweaters I thought they could work as a mug cozy as well, and mom was on board too!
These were soooo easy to make, and if you can sew on a button, you’re golden. And if you can’t, I’ve got you covered with a ZERO sewing version. A sewer I am NOT!
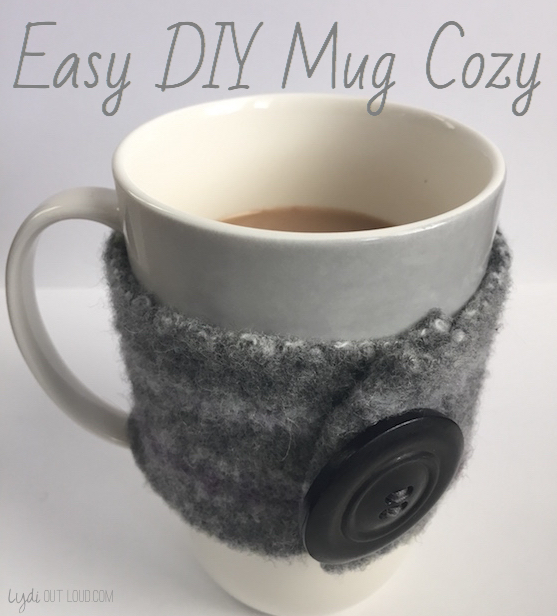
I started with a basic gray sweater.
- Using sharp scissors, I cut off the cuff of the sweater sleeve.
- Next, I cut an opening in the sleeve along the seam.
- Once you lay the cuff out flat, make any necessary trims so that you have a consistent width.
- I used the closest gray thread that my mom had in her arsenal, it was a great match. She had some black elastic that was too thick, so I cut it into thin strips.
- My mom had as many buttons as you could find at any Joann, so I chose this marbled gray large button that coordinated well with the gray sweater. I’m embarrased to admit my mom had to remind me how to thread the needle to sew on the button (doubling the thread and tying a double knot at the end).
- Finally I sewed the elastic on to the end of the cuff to form a loop big enough for the button to fit through, but not so big that the button wouldn’t be secured.
And that’s it! It’s that easy.


The cozy is perfect for my tea mug! I enjoy tea sometimes in addition to my coffee, especially when I’m sick. I heat the water up in the microwave, which is a simple way to make a quick cup of tea, but when you take it out of the microwave, the mug is screaming hot! Now I put the cozy on before I even put the mug in the microwave, which has prevented blistering burns and messes (I have, more than once dropped a too hot mug coming out of the microwave!)
After I made this one, I cozied up on the couch on with a warm blanket and my warm cozy tea mug and it was a perfect afternoon to watch the snow come down and read a book.

Apparently Tootie also found it comforting, she kept rubbing her face on the cozy while I was trying to get these pictures! She makes a good accessory for the mug. Or vise-versa.

Next I wanted to try making one with the patterned part of a sweater. This chunky wool and chunky big button looked so warm and cozy for my coffee mug! I cut a portion out of the sleeve that had my favorite pattern.
For this style, I started with steps 1 – 5 above.

Since the button on this one is so big, I decided to cut the button hole in the sleeve. This allowed for a more snug fit because the sleeve didn’t have the elasticity of the cuff. To do this, I folded the cozy lengthwise and cut a small slit. I had to increase the size of the slit a few times to fit the button, but it’s better to start smaller to avoid having a button hole that turns in to a button abyss.

I loved drinking my coffee with this snuggly mug! Every time I picked it up in my office I felt that warm fuzzy feeling they try to depict in those “best part of waking up” commercials.

So, want to make it really easy? This one requires little or even NO sewing!
Ok so this will seem completely off topic, but I’ll tie it in if you can stay with me for a second… Whenever I go to Starbucks and am forced to put on my own cardboard sleeve on my cup, I touch the cup to see if I can handle the heat of the cup and avoid the cardboard. Partly, because it creates less paper waste, and partly because the sound of cardboard on cardboard (or Starbucks cup material) is like nails on a chalkboard for me. I can’t take it.
Sooo I decided to make a Starbucks cup cozy!
I used another cuff from a charcoal gray sweater that I had in college, and this one requires only step 1 (plus step 5 if you like the button look, like I do). I sewed on the button to replicate the look of the others but there is no opening on this one, it just slides right on!

Please don’t judge me for my extra shot of espresso. 😉

This was such a fun and EASY crafternoon project with my mom. I initially thought of making them as gifts, but I’ve been loving using them! I will have to whip up some more for gifts!
I hope you’re having a warm and cozy weekend (brrrrr it’s cold!), and HAPPY VALENTINE’S DAY!


Heather says
I love that the cozy is removable and transferable to any mug. I was thinking what a dishwasher mess, but love the versatility.
Mom says
It was a fun day, dear! Love the picture if tootness making friends with the cozy. Love, mom