
My Mixed Media Travel Bullet Journal is sponsored by DecoArt, Inc. All ideas and opinions are mine alone.

One of the things I was most excited about working with DecoArt is that I would be forced (in a good way!) to stretch beyond my comfort zone in working with products and mediums that are new to me. Each month we are given an assignment that usually consists of a theme and a product category. This month’s challenge was bullet journals and DecoArt Media products. I have always loved the idea of mixed media (I love texture variation in art and life!) but this was my first time experimenting with it.
I decided to make a mixed media travel bullet journal because Ryan and I have this issue where we often can’t remember the names of places we go when we travel. This is so annoying when we want to go back to a place we loved or recommend it to a friend!
I was amazed how easy (and fun!) the media products were to work with! Whether you want to make a travel bullet journal of your own or want to experiment with mixed media, this tutorial will hook you up!
Mixed Media Travel Bullet Journal
Supplies

- Plain journal
- DecoArt Media Modeling Paste in White
- DecoArt Media Fluid Acrylics in Titanium White, Pyrole Orange, Ultramarine Blue and Interference Gold
- Stencil design (I used the Americana Dandelion stencil)
- Paint brush
- Palette knife or a straight edge
- Primer (if using a chipboard or other raw surface)
Directions
- If using a chipboard or other raw surface for your travel bullet journal, prime the cover surface and allow to dry. I made my own bullet journal out of chipboard and didn’t have any Gesso so I just used Americana Decor Chalky Finish paint in Everlasting. After the first coat of paint dried I lightly sanded the surface and applied another coat.
- I mixed Titanium White and Pyrole Orange (only partially) to create a marbled salmon color and applied it to the journal cover. Then I brushed Interference Gold over the entire surface. The interference colors create a beautiful irridescence that shifts color with movement. GORGE.OUS!

- I adhered my stencil design onto the journal cover (I sprayed it with a little adhesive to keep it in place) and applied a layer of Modeling Paste over the stencil surface. I smoothed the paste with a flat surface tool (you can even use your drivers license if you’re in a pinch) and allowed it to fully dry.
- I mixed blue and white paint and dabbed the periwinkle color over the stencil surface with a makeup sponge. Less paint on the sponge is better to avoid stencil bleed-through.
- I added my lettering with vinyl letters (other than the “t” in lost which is part of the dandelion stencil). I wish I could flash this journal cover for you so you could see what the holographic vinyl looks like in real life… it looks blue, violet, periwinkle or opal depending on the light. So pretty!


I had so much fun with this project that I decided to make a back cover for my travel bullet journal too. Here’s how I made the back:
Supplies

- DecoArt Media Modeling Paste in White
- DecoArt Media Fluid Acrylics in Titanium White, Cobalt Teal Hue, Blue Green Light, Interference Turquoise, Hansa Yellow Light, Cadmium Orange Hue, Cadmium Red Hue and Interference Gold
- Stencil design
- Paint brush
- Palette knife or a straight edge
- Primer
Directions
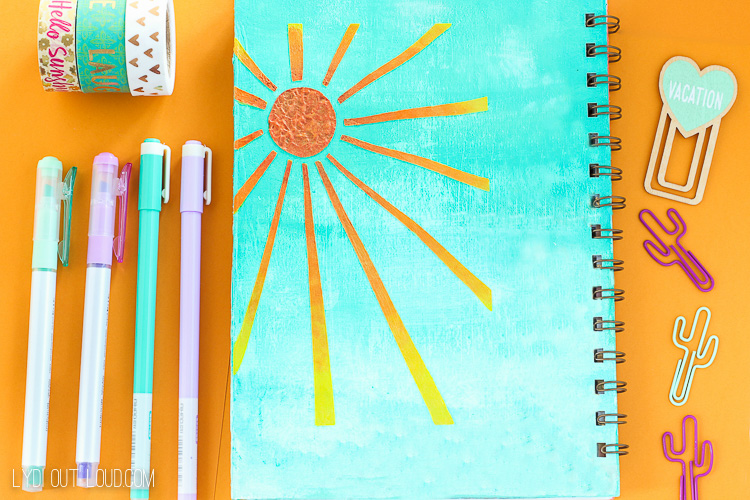
- On my primed surface, I mixed the below colors with Titanium white and applied to the top of my travel bullet journal back cover. To create a gradiant color wash, I added more of the colors to the paint lighter color I started with, building up to the darkest color as I moved down the surface. It was a little more opaque than I wanted, so I balled up a tissue and dabbed it across the cover to remove some of the paint and create more dimension. Aaaand my love affair with interference continues in my love language, turquoise.
- I adhered my stencil design onto the journal cover (this is a design I cut).
- I mixed a little bit of yellow paint into the Modeling Paste and spread it over the stencil surface (the same as above) and then stippled a little more paste onto the sun to mimic the sun’s craters.
- Once the paste was dry, I stenciled the sun and rays, starting with red and then switching to orange (using the same sponge) and then yellow (with a new sponge).
- Then you know the drill… gold interference on errrrything.


We’ll use our travel bullet journal as a place to document our travels, update our travel bucket list and as a travel scrapbook/memory book of sorts.
What kind of project would you like to try with mixed media? Don’t be scared, it’s so much fun!
Pin it for later!


Monica says
This would make a great gift!
Lydia says
Great idea Monica! Thanks for stopping by and for your comment!
Bobbi says
It’s gorgeous! And what FUN to do I would think. And now, you just need to take it off on an awesome adventure somewhere soon so that you can record more.
I loved how you started the post, with doing something that would get you out of your comfort zone – and it turned out great!
Lydia says
Thank you so much Bobbi! I’ve actually been adding to it already (retroactively for past vacas haha!) and just made some fun planner clips for it too. 🙂
Emily says
Lydi this is awesome! I love the quote you chose for the front. I always admire mixed media art but have been hesitant to try it myself – but you’re inspiring me to give it a go!
Lydia says
Thanks so much Emily, I’m so glad you like it! 🙂 Definitely give it a go… you’ll be hooked I promise! Have a great weekend friend!
Sheena says
I absolutely love your journal!!! You did a great job!! I did not think about painting one and making it all mine. I have lots and lots of journals that I write in almost everyday.
Lydia says
Thank you so much Sheena, that is so sweet of you! It does seem to make it more fun to want to use decorated. 🙂 Have a great weekend! 🙂
Terri says
Lovely! I just started bullet journaling but have been a paper crafter for years. I would love to try mixed media some day soon.
Lydia says
Thanks Terri! That was my same boat! Definitely give it a try… it’s so different than other crafting types and much more forgiving I found too! 🙂
Sarah Carletti says
I love this! It turned out great. I’ve been thinking about making one for travel this year. I think to try new things too. You did a great job.
All the best,
Sarah
Lydia says
Thank you so much Sarah! It’s funny… I’m finding myself more excited for my next trip so that I can use it haha! 🙂
Debbie Southwick says
How fun. Great idea.
Lydia says
Thanks Debbie!
Paula says
Very cool, great style!!
Lydia says
Thanks so much Paula! 🙂