
Learn all of the ins and outs of Cricut Design Space with this simple and thorough guided tour. You’ll be Cricut-ing like a pro in no time!

This post is sponsored by Cricut. All opinions shared are my own.
If you’re new to crafting with a Cricut (or Cricut-ing as I call it), you may feel a little (or a lot) overwhelmed when you open up Cricut Design Space. Or even if you’re a more advanced Cricut-er, there may be some ways you can customize projects that you didn’t even know about.Whatever level of Cricut crafter that you are, this is a comprehensive guide to using Cricut’s Design Space and all that it can do.
What is Cricut Design Space?
Cricut Design Space is the design program where you create projects for any of the 3 Cricut machines. There is both a desktop version and apps for iOS and Android.
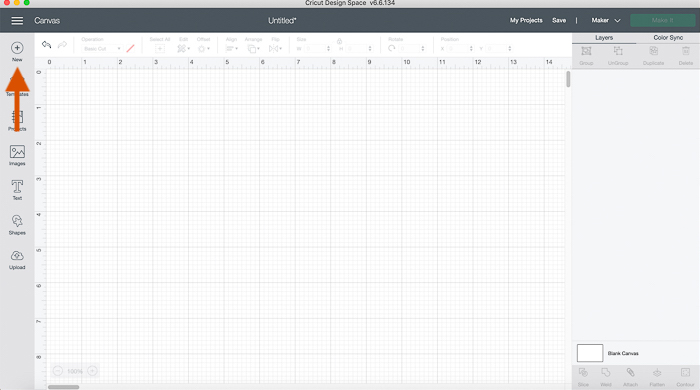
Grab a coffee and let’s take a virtual tour Design Space together. We’ll identify what everything means in each of the tool bars.
First we’ll go over all of the functions in the left toolbar.


When you click Image, there are many ways you can filter the more than 200k images… by Cricut Access subscription images (free to all Access subscribers, more on that later), by Operation Type (cut only, draw only, print then cut or cut and draw), Image Complexity (simple, moderate or complex), Layers (single or multi), Ownership (whether they were free or you purchased, uploaded or downloaded them), Brand (Disney, Sesame Street, etc.), Material (vinyl, iron-on, chipboard, etc.) and Language.

(see below for fonts).


Now let’s go over all of the functions on the top of the Design Space canvas…


Arrange will allow you to move a subject up or back one level (Move forward or Move backward) or to move a subject all the way up or back (Send to back or Send to front).


(x = horizontal and y= vertical)


Use Letter Space to bring letters closer together or move them further apart. This is especially helpful to create an actual script since the letters in all fonts are separated (like in the above left photo).


Use Line Space to bring lines of text closer together or move them further apart.


Now let’s head over to the top right menu of Design Space:


Click Make It when you’re ready to cut your project. Then you will see a screen with all of the mats in your project.
We’re in the home stretch! Let’s review the right tool bar!


Use Group and UnGroup when you want to cut something exactly as it was designed (Group) or by its individual elements (UnGroup). I often use UnGroup when I want to maximize my mat space and shift things closer together so conserve materials.

Last but not least, the bottom right toolbar enables you to make many custom changes to your designs.


The Slice function allows you to cut off a section or an element of a letter/design/image by “cutting it” with another layer. Slice will only work with 2 separate layers.


That covers all of the function keys and toolbars in Cricut Design Space. Let’s dig into some of them a little more.
Cricut Operation Selection
This dropdown menu has come a long way! When I got my first Cricut the only 3 options were cut, draw and print then cut and look at all of the things you can do now!
The operation types shown in the dropdown menu will always correspond to whichever machine you are using. For example, if I was using a Cricut Joy, the Wavy cut, Perforate cut, Foil, Score, Deboss, Engrave and Print Then Cut options would not be listed because they aren’t compatible with the Joy.
The Wavy, Perforate, Deboss and Engrave operations are exclusive to the Maker only, as they work in combination with the Maker’s Adaptive Tool System and QuickSwap suite of tools. You can read much more about these here. The Foil Transfer kit can be used with the Maker or Explore Air 2.
So I hope you feel like you’re ready to conquer Design Space now and are inspired to get Cricut-ing! If you ever have any questions about Design Space (or anything else) definitely hit me up on social or email, I love to hearing from readers and am always ready to help!


Jamie says
Amazing!!