

So let me start by saying I do not enjoy painting. Not even a little. Due to our high ceilings, we had to hire someone with a very big ladder to paint the main areas, but we did take on some of the smaller ones. Since this chore is at the bottom of my love pile, I needed all the painting hacks I could find! I’ve collected some tips to make this chore much easier that save loads of time.
Painting hack #1: Picking a Color
As I mentioned, when we bought our new house, the first project was all of the main living area painting. Little did I know when deciding that we wanted gray how many shades of gray there are (let me tell you, it’s definitely more than 50!). There is blue-gray. Green-gray. Brown-gray. Lavender-gray. Basically every color in the crayon box-gray. So picking out our paint that would be in the majority of the house put us in quite a pickle!
As we’ve all seen on Pinterest, the swatches in those paint chips you get from Sherwin Williams can be made in to all sorts of cute crafts. What they don’t do is give you a real idea of what the paint color is going to look like on your walls. It’s all about the sample jars! Apply paint swatches of the colors you’re considering on to the areas that you will be painting is a MUST! There are so many factors that will impact the way the color looks: lighting, surrounding wall colors, floor color, etc, the direction your home faces, etc. Put a couple of coats on the walls and look at them at different times of day to see how they look with different lighting levels. The couple bucks you invest in paint samples will save you much frustration and money (when the color ends up looking horrid in real life!) See how different all of the colors are below? I would have been not very happy with almost all of them, although I loved them in the paint deck.
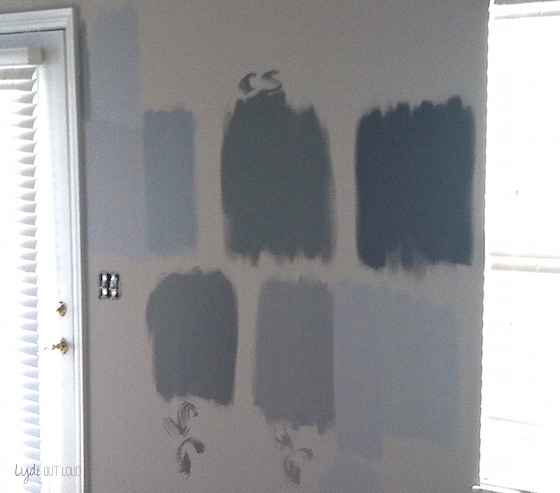
Below is the gray we decided on (please pardon the midday shadow). What do you think?

Lydi Out Loud
Painting Hack #2: How much paint to buy?
It’s important when buying paint that you buy ALL that you will need for that room prior to starting. If you underestimate the quantity, you run the risk of the next batch of paint you buy not matching your existing paint already. A good rule of thumb for how much paint to buy:
Multiply length times width of the area you will be painting to calculate the square footage. For most surfaces and colors, you need a gallon of paint per 400 square feet.
Painting Hack #3: Prep your surface
Prep walls by wiping them down with a Swiffer. This way any dust or dirt is removed and not buried under the paint.

Found on Driven by Decor
Painting Hack #4: Minimize hassle for small jobs
This trick is brilliant! When you’re doing a little job or touch up, you don’t want to hassle with pouring paint in to a roller pan (at least I know I don’t). Put a large rubber band around the can so that you can easily wipe the excess off of your brush somewhere other than the edge of the paint can (the edge will get crusty with paint and you won’t be able to close the lid again tight enough to preserve the paint).

Found on Good Housekeeping
Painting Hack #5: Save time big time on paint cleanup!
The messy cleanup is probably the biggest reason I dislike painting, well, one of many reasons. My dad blew my mind with this tip: lay down Glad Press ‘n Seal in your roller pan before pouring in your paint. When you’re done, simply dump out the excess paint and throw away the press and seal wrap. Easy and even mani-proof!

Lydi Out Loud
Painting Hack #6: Get in there!
For those hard to reach tight spots, get a paint edger refill pad and hot glue it to a paint stir stick.

Found on Family Handyman
Painting Hack 7: Take a break!
With already having a bad back, another of my favorite (insert sarcasm here) aspects of painting is how achy my back gets. Wow, I sound 80. 😉 Make sure to take breaks, and when you do, wrap your roller and cover, along with your brush tightly in grocery bags so that the paint doesn’t dry out during your hiatus. Also, put another piece of Glad Press ‘n Seal over the paint in your roller cover to prevent it from drying out.

Lydi Out Loud
Painting Hack #8: Avert paint crises
Pointy Q-tips work famously to clean up areas where you may have painted outside the lines, but you don’t want to disrupt the surround area. Get the tips a little damp first so that you don’t end up with fuzz embedded in to your paint.

Found on In My Own Style
Keep your facial cleansing wipes on deck! The alcohol in them will break down paint oops-es while the conditioning ingredients won’t harm most floor surfaces (make sure to do a spot test first).

Found on Family Handyman
Painting Hack #9: How to thoroughly clean your brushes
Soak your gunky paint brushes for a few minutes in hot vinegar; this will remove the bulk of the paint and soften the bristles. Rinse them out well and then wash them thoroughly with warm soapy water; rinse thoroughly.

Found on This Old House
Painting Hack #10: Mark your paint so you know which is what
I remember moving in to my condo and stumbling upon 8 gallons of paint that gave me no indication of what color they were and what room they were in. I couldn’t have identified the colors if I tried because there was so much caked on, rusted paint that the lid was impossible to open. When you’re done with your painting project, pour the remainder into an airtight container, write the paint style number and put a dollop of the paint on the top of the lid and mark the room where it was used. This will save a lot of time for any future touch up’s and save you from (trying) to open multiple paint cans.

Lydi Out Loud
Whether you like to paint or not so much like me, I hope these painting hacks will help remove the tedious aspect of your painting projects! Do you have any other favorite painting tips and tricks to share with me?
Thanks for reading, I hope you had a wonderful weekend! 🙂


Joyce says
If you’re stopping for the day and plan on continuing painting in the next few days you can store your painted brush in a plastic bag and place in the refrigerator. No washing and ready to go again.
Lydia says
That’s a great tip Joyce! Washing the brushes is the worst part in my opinion so anything to lessen that I am a big fan of! Thanks for sharing!
Julee says
Use a flathead screw driver and a hammer and hammer several slits in the top rim of the paint can. When you pour paint into something else, the excess paint that is around the top of the can will drain back in for less waste and a cleaner can.
Lydia says
That’s a GREAT idea Julee! Thanks so much for sharing! 🙂
Cecille says
Thanks Lydia, those are some great tips. For the Saran wrap….love that. I usually take a grocery bag; flip it inside out (the ink from the name will bleed in your paint) stick the paint tray inside and tape the to the bottom of the pan. Also a neat trick for making the brush clean up less messy is to remove the excess paint on a spare piece of board.
Lydia says
Those are great ideas Cecille! Thanks so much for sharing! 🙂
Emkay says
Be careful!
Tried the vinegar for brush cleanup and ruined two brand new brushes, the 2 inch one and 1/2 inch one, in acrylic paint just hardened in warm vinegar.
Suzette says
These are some live-saving tips! Love them! Thanks! 🙂 <3
Lydia Nordhoff says
You’re welcome! 🙂
Randa says
What is the name of the gray you chose? Is it the same gray you used on your fireplace wall?
Lydia Nordhoff says
Hi Randa!
The paint that we chose as the allover gray is by Glidden and it’s called “Granite Gray.” The gray for the fireplace wall is Sherwin Williams “Cityscape” which is a darker gray accent wall. If you’re getting ready to start a project, good luck! I’d love to see pictures. 🙂
-Lydi
Elaine says
Great tips Lydi. Can’t stress enough to label those cans. Unfortunately I learned from experience, especially when you have similar colors.