
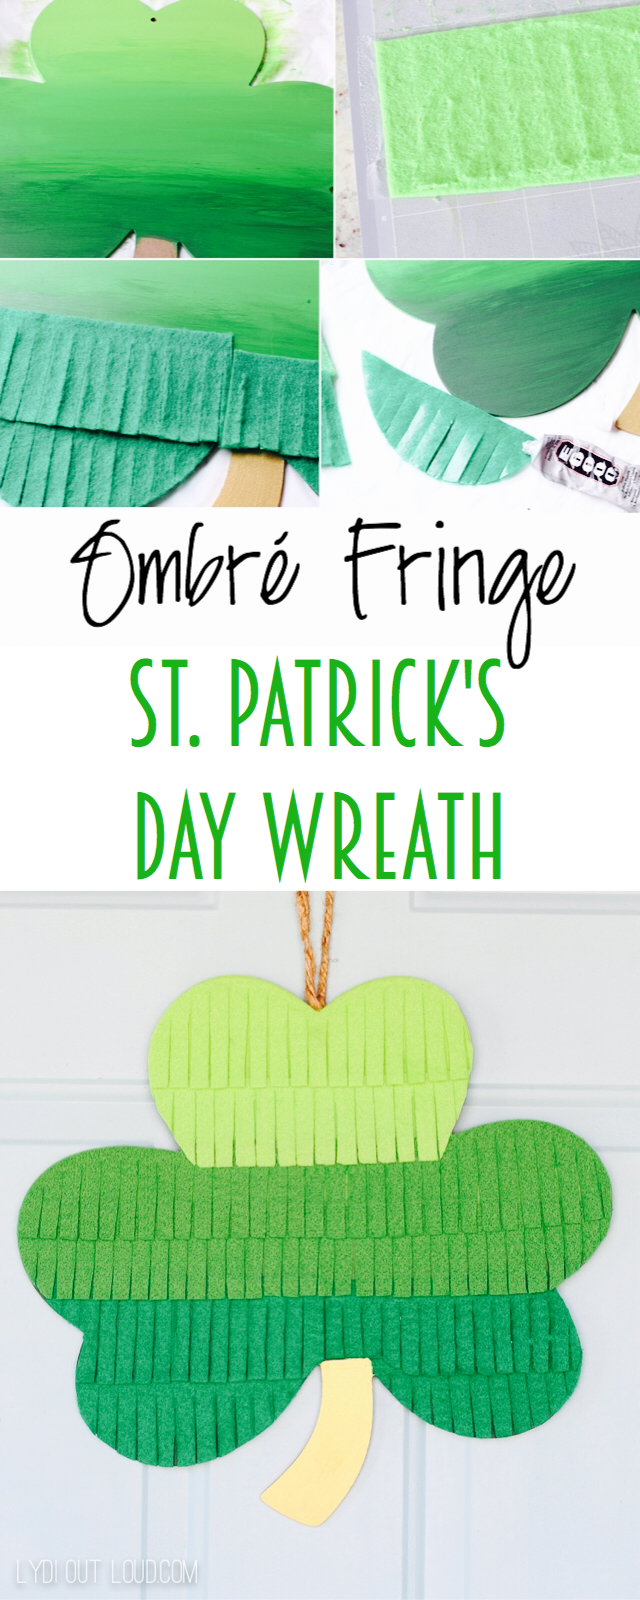
This DIY Fringe St. Patrick’s Day Wreath brings a fun ombre flair to the front door in shades of green with a metallic gold stem.

Hey friends, I hope you had a great weekend. Irish or not, here I come! Well technically I think I’m like 2.75% Irish and I’m gonna go with it (at least until St. Patrick’s Day!) I had the idea for this St. Patrick’s Day wreath last year on 3/18. Oops that was a little too late. I’ve never decorated much for the holiday (which totally doesn’t make sense considering my love of green!) but that’s mostly because I didn’t ever really see any decorations that I loved.
I’m pretty excited that the St. Patrick’s Day wreath came out exactly as I envisioned it! If you’ve hung around on the blog with me before, you may know my love of ombré (if you didn’t know you can see some examples here and here) so I went that route with the wreath. I knew as soon as I had the idea that this was not going to be something I could free-hand since my drawing AND cutting skills don’t qualify as skills. So of course I had my Cricut do all of the work for me. Dang I love this thing! I mean is there really anything I can’t do with it? Don’t think so.
Ombré Fringe St. Patrick’s Day Wreath
Supplies
- Cricut Explore Air 2
- Shamrock images
- Deep cut blade
- Cricut strong grip cutting mat
- 3 – 8″ x 10″ pieces of green felt in various shades
- Craft adhesive
- HeatnBond
- Shamrock form (mine is MDF but if you don’t have one, you can cut one out of cork or chipboard from the image cut files below and piece them together)
- Green paints (I used Americana Acrylics Radiant Yellow, Green Tree and Festive Green)
- Metallic gold paint (I used DecoArt Dazzling Metallics in Glorious Gold)
- Foam paint brushes
- Jute rope
- D-ring picture hanging hardware
Instructions
Cut out shamrock shape if necessary (using the files here) and piece together to form complete shamrock. Paint the shamrock starting with lightest to darkest shades, blending each layer into the one above to create ombré effect.


Paint the stem with 2 coats of metallic gold paint.

Download shamrock images (here) and upload them into Cricut Design Space. If you haven’t uploaded images on Design Space yet here is a quick tutorial. Adjust the size if necessary for your shamrock design.

Iron heat and bond onto the back of felt pieces. Peel away paper backing once cooled.

Cut lightest green felt for top 2 rows, medium green for rows 3 & 4 and the darkest green for last 2 rows.

Starting with the bottom pieces of felt and working up, apply a thin band of craft adhesive to the band of each piece of felt and adhere to the shamrock form.


To hang the St. Patrick’s Day wreath, screw in a D-ring picture hanger, wrap the jute rope through the ring and tie in a tight knot.

If you didn’t catch up my wreath hanger tutorial (waaaay long ago on one of my first blog posts!) you can see it here.

My door is ready for St. Patrick’s Day!

Pin it for later!
This is a sponsored conversation written by me on behalf of Cricut. The opinions and text are all mine.


Stephanie Dolph says
This is so festive and easy. I love it. Thank you for sharing!
Lydia says
Thank you so much Stephanie! Thanks for stopping by to say hi!
Kimm at Reinvented says
I love how big and bold it is. Very cool!
Thanks for sharing at Funtastic Friday!
Lydia says
Thanks so much Kimm and thank you for hosting!
Hope says
What an awesome one of a kind (until it goes viral) St. Pat’s door decoration. I will make this for my door.
Leslie says
How cute! I often have great ideas that are too late to execute. Thank goodness you remembered this idea for this year!
Heidi Larsen says
Wow that is cool! I love St. Patrick’s Day and the themed events that go with it. This would be great for my St. Patty’s day party. Very unique!!
Lydia says
Thanks so much Heidi! Have fun with your party!