
Rainbow Tile DIY Backsplash with the Cricut Maker
Transform a dull bathroom with this cheerful rainbow tile DIY backsplash... grab your Cricut Maker and some permanent adhesive vinyl and create a beautiful (budget friendly!), completely custom backsplash.
Cost: 75.00
Equipment
- Cricut Premium Vinyl Pearl Metallics in Pink, Maize, Coral, Mint and Bright Teal (for the middle of the rainbows)
- Masking tape
- Scissors
- Rainbow tile backsplash cut file
- Portable paper trimmer
Instructions
- Open the rainbow tile backsplash cut file in Cricut Design Space and click Customize. Count how many rainbows and hearts you will need for the amount of tile backsplash you'll be applying the designs and adjust quantity as necessary. My tiles are 4 ¼" so if you are using different sized tiles you can also adjust the size to fit your tile.
- Once you're design is ready, click Make it. Choose Premium Vinyl for the cut box and double rainbow portion of the designs and the hearts. Even though the middle of the rainbows are being cut out of pearl metallic vinyl, for those cuts change your cutting material to Heavy Cardstock.
- Load the materials and cut.
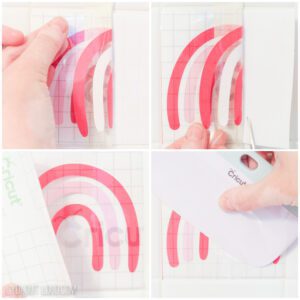
- Weed the excess vinyl from the cut boxes and double rainbow designs and gently peel the middle of the rainbows off of the cut mat.
- Once the rainbows are assembled, apply transfer tape over the tile designs. Using a portable paper trimmer, trim just inside each cut box

- Remove the liner one half at a time with the hinge method.

- Ensure that the tile for your DIY backsplash is clean and dry. Swipe with rubbing alcohol and allow to dry to ensure the tiles are free of any oils.
- Position the rainbows and hearts (with the liners and transfer tape) onto the tiles where you want them and secure with masking tape down the center. Apply with the hinge method, ensuring that the vinyl is firmly adhered to the tile before peeling the transfer tape back.
- Carefully peel back transfer tape.

Notes
If using this rainbow backsplash in a shower or bathtub, seal with clear urethane or epoxy.